
Sunday, August 8, 2010
Carbucks - Hauler Decals
And here are the decals for the trailer of the hauler. I have to come up with a good name for him OR her. :-)

Carbucks - Pit Crew and Chief
I started on the Pit Crew and Crew Chief (car version) this weekend. I bought the Leakless Pit Crew set so I could get 3 different styles of Pit Crew guys. PLUS I like the box background because it's blank (no cars printed on it)...which means I can scan it an use later.
I got all 4 of them apart. Took them outside to start the paint removal. Put the chemical on it then I realized that that the Pit Crew's had plastic faces. But it was TOO late. The chemical had already burned their little smiles away. :-(
WHAT TO DO!
I managed to remove the little pitty faces from the body, wash them off and save MOST of the shape. I then sanded it down to a semi smooth surface. Later I had to make little smile decals to recover their face. BUT I almost had a major problem!!
Here's a few images of the work in progress. Once every thing has dried for 24 hours, I'll put it all back together and I will have a Carbucks Pit Crew! :-D


NEXT UP....THE HAULER!
I got all 4 of them apart. Took them outside to start the paint removal. Put the chemical on it then I realized that that the Pit Crew's had plastic faces. But it was TOO late. The chemical had already burned their little smiles away. :-(
WHAT TO DO!
I managed to remove the little pitty faces from the body, wash them off and save MOST of the shape. I then sanded it down to a semi smooth surface. Later I had to make little smile decals to recover their face. BUT I almost had a major problem!!
Here's a few images of the work in progress. Once every thing has dried for 24 hours, I'll put it all back together and I will have a Carbucks Pit Crew! :-D
NEXT UP....THE HAULER!
Friday, July 30, 2010
Part 1 - Customizing A Cars Car
Part 1
First things first. I had to work out 2 important things. The logo and the theme of the car. I decided to take a play on my FAVORITE thing in the whole world...STARBUCKS! YUM! I ended up with Carbucks: Regular or Unleaded. The fuel for the expresso lane! DeCARfinated. CARpuccino! I could go on but you get the idea!
I don't there there is a number 75 in the set yet. I hope not because I like 75. It was the year I was born! :-) (and today is my bday!)
Here is the very rough 'comp' of the car I'm making:

Now to prepare the car.
I found some racers on sale at Kmart for $1.99. I picked up a few. First I had to bust the car apart by drilling out the little bolts.

Once the bolts were cut free I could take it apart. I had to be very careful not to break the plastic when I took out the windshield.

Next comes the paint removal. I used some paint stripper I had on hand. It worked like a charm! In about 10 mins it was bubbling and ready to be washed clean.

Now cleaned and very lightly sanded it was ready for priming. The smoother the surface the better the paint job!

It's going to dry over night so that the primer can really set up nicely. I'll lightly sand it so it's even more smooth for the final base coat of white paint. Then comes the detail painting and finally the decals.
It's been drying for a long time now and I've gone in with the first base coat. I'm going to have to let it dry 100%. Cure all the way through. Then I think I need to give it a slight sand in a few areas. It's starting to "pitt" on me! BLAH!

More to come....I CAN'T WAIT!
First things first. I had to work out 2 important things. The logo and the theme of the car. I decided to take a play on my FAVORITE thing in the whole world...STARBUCKS! YUM! I ended up with Carbucks: Regular or Unleaded. The fuel for the expresso lane! DeCARfinated. CARpuccino! I could go on but you get the idea!
I don't there there is a number 75 in the set yet. I hope not because I like 75. It was the year I was born! :-) (and today is my bday!)
Here is the very rough 'comp' of the car I'm making:
Now to prepare the car.
I found some racers on sale at Kmart for $1.99. I picked up a few. First I had to bust the car apart by drilling out the little bolts.
Once the bolts were cut free I could take it apart. I had to be very careful not to break the plastic when I took out the windshield.
Next comes the paint removal. I used some paint stripper I had on hand. It worked like a charm! In about 10 mins it was bubbling and ready to be washed clean.
Now cleaned and very lightly sanded it was ready for priming. The smoother the surface the better the paint job!
It's going to dry over night so that the primer can really set up nicely. I'll lightly sand it so it's even more smooth for the final base coat of white paint. Then comes the detail painting and finally the decals.
It's been drying for a long time now and I've gone in with the first base coat. I'm going to have to let it dry 100%. Cure all the way through. Then I think I need to give it a slight sand in a few areas. It's starting to "pitt" on me! BLAH!
More to come....I CAN'T WAIT!
Wednesday, July 28, 2010
Bento 3: How to keep up with my Cars Toys
Yeah, I know I'm a little old to be collecting Cars toys. GET OVER IT! :-)
Since I'm a super nerd I decided to use Bento 3 to organize all the toys as I hunt them down in the stores. This way I don't end up buying two of the same car.
Here's how I'm doing it using BOTH Bento 3 for Mac and for iPhone.
On my Mac I went into and creating the Library. From there I populated it on my computer then sync to my iPhone. The cool part of Bento for iPhone is that when I'm out at the stores I can not only check my inventory but make or modify new entries. When I get home I can re-sync on my computer. NICE!
Here's how its done:
1) After creating the page (or database) in Bento 3 just add entries. Simple.

2) Add more detail to the entry including an image.

3) On the iPhone I can view listings

4) Update, View, or Create a new listing.

If any one is interested in more detail just contact me at: jbfatcats@cox.net . I'd be happy to share more details.
Since I'm a super nerd I decided to use Bento 3 to organize all the toys as I hunt them down in the stores. This way I don't end up buying two of the same car.
Here's how I'm doing it using BOTH Bento 3 for Mac and for iPhone.
On my Mac I went into and creating the Library. From there I populated it on my computer then sync to my iPhone. The cool part of Bento for iPhone is that when I'm out at the stores I can not only check my inventory but make or modify new entries. When I get home I can re-sync on my computer. NICE!
Here's how its done:
1) After creating the page (or database) in Bento 3 just add entries. Simple.
2) Add more detail to the entry including an image.
3) On the iPhone I can view listings
4) Update, View, or Create a new listing.
If any one is interested in more detail just contact me at: jbfatcats@cox.net . I'd be happy to share more details.
Monday, January 25, 2010
Noah's Little Photo Shoot
I'm using the term photoshoot lightly! It was anything but in all honesty. First of all, I don't know much what I'm doing. Secondly, Noah was ALL over the place. I had too much to do in order to think about my camera settings and chase after him. But, I think I ended up with a few good images in the end.
I thought I would walk you through the steps I took to get one of my favorite moments and pics of the day. So here we go...
I had my 50mm/1.8 lens on my camera. Looking back I probably should have use another lens since his quick little movements created a lot problems with getting him in the sharp 'in focus' area long enough to push the shutter. Oh well, what did I expect from a 15 month old!
I was in manual mode on my camera at ISO 100, f/3.5 and 60th of a second. My flash was off to my right and not really in position, yet. But it was enough to, at least, cut the gray clouds and give me a little shadowing.
Here is the picture as shot:
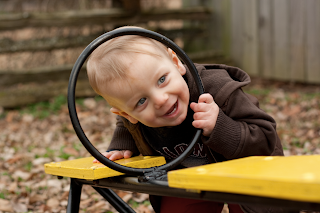
Normally I go straight to Lightroom first. This time I went to Photoshop. The first thing I did was adjust the skin tone. I noticed two things in the skin.
1) It was slightly cold out so his nose, lips, cheeks and hands were getting red.
2) The reflection of the bright yellow toy creates a really green/blue shadow.
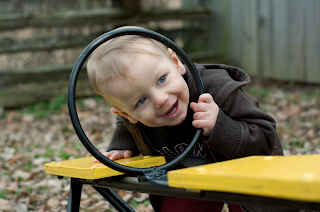
After deciding I was okay with those problems I moved on to fixing his little bags under his eyes. The cold wasn't helping them this morning (but he is still CUTE!).
Here is the picture with the skin tone fixed and the eyes shadows slightly toned back:
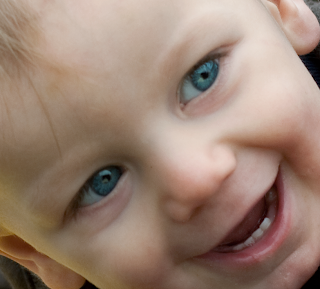
Next I moved on to brightening his eyes. I pushed the blue color a bit more than probably 'real life' eyes in cloud gray weather. But I wanted them to sparkle! I did a layer of sharpening and one for color.
Then I decided I wanted to warm the image up a little. The blue/green "correction" wasn't working for me. I added a solid color layer over top (sort of like a CTO gel color) and set that layers blend mode to COLOR. I pulled the opacity way back to 10%.
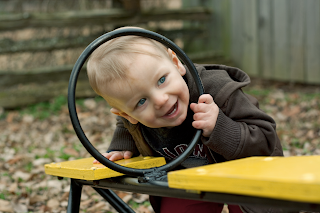
Finally, after this final color adjustment was made I felt like I wanted to do some work on the shadow/hightlights. It was getting too contrasty for me. It brought out some more detail hiding in the blacks.
I darken up the edges a little. I'm NOT one to really go hog-wild with my edge burning. I think people do WAY too much of that these days. If you go too far with it, it just ends up looking yuck. There is a place for going really far and having dark edges! But generally, I don't like it. That's just my opinion.
Here is the final image.
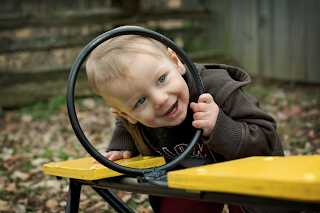
I thought I would walk you through the steps I took to get one of my favorite moments and pics of the day. So here we go...
I had my 50mm/1.8 lens on my camera. Looking back I probably should have use another lens since his quick little movements created a lot problems with getting him in the sharp 'in focus' area long enough to push the shutter. Oh well, what did I expect from a 15 month old!
I was in manual mode on my camera at ISO 100, f/3.5 and 60th of a second. My flash was off to my right and not really in position, yet. But it was enough to, at least, cut the gray clouds and give me a little shadowing.
Here is the picture as shot:

Normally I go straight to Lightroom first. This time I went to Photoshop. The first thing I did was adjust the skin tone. I noticed two things in the skin.
1) It was slightly cold out so his nose, lips, cheeks and hands were getting red.
2) The reflection of the bright yellow toy creates a really green/blue shadow.
After deciding I was okay with those problems I moved on to fixing his little bags under his eyes. The cold wasn't helping them this morning (but he is still CUTE!).
Here is the picture with the skin tone fixed and the eyes shadows slightly toned back:

Next I moved on to brightening his eyes. I pushed the blue color a bit more than probably 'real life' eyes in cloud gray weather. But I wanted them to sparkle! I did a layer of sharpening and one for color.

Then I decided I wanted to warm the image up a little. The blue/green "correction" wasn't working for me. I added a solid color layer over top (sort of like a CTO gel color) and set that layers blend mode to COLOR. I pulled the opacity way back to 10%.

Finally, after this final color adjustment was made I felt like I wanted to do some work on the shadow/hightlights. It was getting too contrasty for me. It brought out some more detail hiding in the blacks.
I darken up the edges a little. I'm NOT one to really go hog-wild with my edge burning. I think people do WAY too much of that these days. If you go too far with it, it just ends up looking yuck. There is a place for going really far and having dark edges! But generally, I don't like it. That's just my opinion.
Here is the final image.

Sunday, October 4, 2009
Mr Spock Custom Star Trek Doll

So I thought I would post a quick entry about my newest Lil Fatty member. It's a modification of my Star Trek series. Check him out here or at my etsy store
jbfatcatstudio.etsy.com
Sunday, May 24, 2009
Kitty Bed Project
So Friday Mom sent me a link to a website that had a kitty bed project that she thought I would enjoy making. Well she was right. I went out after work on Friday and got all my stuff including the end table that I picked up at our local Restore.
Here is the table before I did any thing to it:

First thing I did was take it all apart. I wasn't able to just flip the table over because it had a glass top originally. So I took it all apart to figure out what parts I needed.

I took the bottom panel and flipped it over so the real bottom was facing up. Then I took the little feet and placed them back in the holes with a little wood glue.

I reassembled the legs and side panels. At that point I realized I need to screw the legs back on the feet posts. Luckily the glue on the feet hadn't setup. I was able to pull them off and reassemble the legs, side panels, lower panel and feet.

I purchased 4 finals for the ends of my legs. I thought they would work with the holes from where the old table panels were screwed on. But they didn't. So I cut off the square block end of the legs. I drilled new holes and screw the finals into with some glue.
I also cut down a small piece of wood for the "headboard". I planned on painting something on it like, "Cat Naps". But I don't know now that it's all together!

Next came the primer, paint and clear coat. I went with a light baby blue since I have a lot of light blue through the house. I haven't decided yet if I'm going to sand down the edges to antique it a little or not. I kind of like it solid but I do like the antique look, too.

Finally I bought a pillow because it seemed to fit almost perfectly. I got a real fluffy one since the cats are only a LITTLE spoiled. :-) I found some fabric that I liked at Wally World. There you go!

It didn't take Socks long to realize it was HER new bed. She's already brought some toys over to it. I hung her most fav toy off one of the posts. I think I'll probably string some play things off the posts.

Here is the table before I did any thing to it:

First thing I did was take it all apart. I wasn't able to just flip the table over because it had a glass top originally. So I took it all apart to figure out what parts I needed.

I took the bottom panel and flipped it over so the real bottom was facing up. Then I took the little feet and placed them back in the holes with a little wood glue.

I reassembled the legs and side panels. At that point I realized I need to screw the legs back on the feet posts. Luckily the glue on the feet hadn't setup. I was able to pull them off and reassemble the legs, side panels, lower panel and feet.

I purchased 4 finals for the ends of my legs. I thought they would work with the holes from where the old table panels were screwed on. But they didn't. So I cut off the square block end of the legs. I drilled new holes and screw the finals into with some glue.
I also cut down a small piece of wood for the "headboard". I planned on painting something on it like, "Cat Naps". But I don't know now that it's all together!

Next came the primer, paint and clear coat. I went with a light baby blue since I have a lot of light blue through the house. I haven't decided yet if I'm going to sand down the edges to antique it a little or not. I kind of like it solid but I do like the antique look, too.

Finally I bought a pillow because it seemed to fit almost perfectly. I got a real fluffy one since the cats are only a LITTLE spoiled. :-) I found some fabric that I liked at Wally World. There you go!

It didn't take Socks long to realize it was HER new bed. She's already brought some toys over to it. I hung her most fav toy off one of the posts. I think I'll probably string some play things off the posts.

Subscribe to:
Posts (Atom)