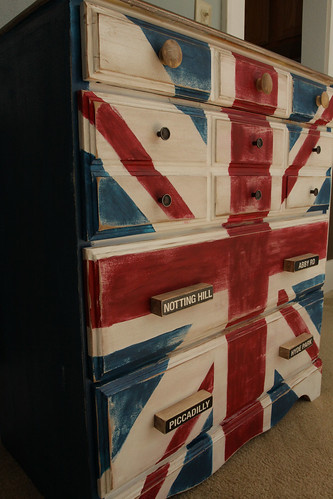
I was stupid this time and didn't get photos of the before. So let me paint this photo for you. Imagine a bright orange box with little bits of bright blue peaking through the pealing paint. Most of the draw pulls were missing and those that where left were broken.
First thing I did was remove ALL the paint. Right down to the wood. I did leave little bits of paint here and there. Due to the HIGH HEAT the paint melt under the sander. I had to break out the big guns and go with the drill attachments! It worked...finally. I now had a nice smooth surface to start the repaint.
First step was to put on a thin primer. Next step was to put on the design. Let me just say this, I'm a designer by trade and it did NOT come in handy this time. I really needed to think through all the color placement. It was not easy to be totally honest. Then comes the distressing...
Distressing to me has to be done with a purpose and not just messed up. Yes, true, there is some randomness that goes into distressing. But I like to go at it with a vision in mind. For me it works better than blind going at a piece with the sander. :-)
Once all my painting and vintage-ing was done I could work on my drawer pulls. I had a clear picture of what I wanted to do with these pulls. I LOVE LOVE making my own. At first I was going to cut them out with scroll saw but then I came across a old subway train sign. That inspired me to switch gears and create four famous "subway sign" words.
Final step is seal everything up. I HATE sticky latex paint. I hate it. Why because it's sticky. I truly believe in using a good quality paint. I also believe in sealing a project with a good quality clear. So that's what I did here. Nothing will keep a project from being "tacky proof" but these things do help a lot!
Here is the final project. You can see more images here.


